FLHA for trenching
Provincial OHS law requires hazards to be assessed and controlled before work starts. A field level hazard assessment (FLHA) for trenching is done on site at the start of the shift and again whenever conditions change.
It lists the tasks, hazards and controls, and every worker signs on before starting and signs off at the end of the shift. The main hazards are hitting underground services, being hit by heavy equipment, road traffic and trench or excavation collapse.
FLHA example: trenching
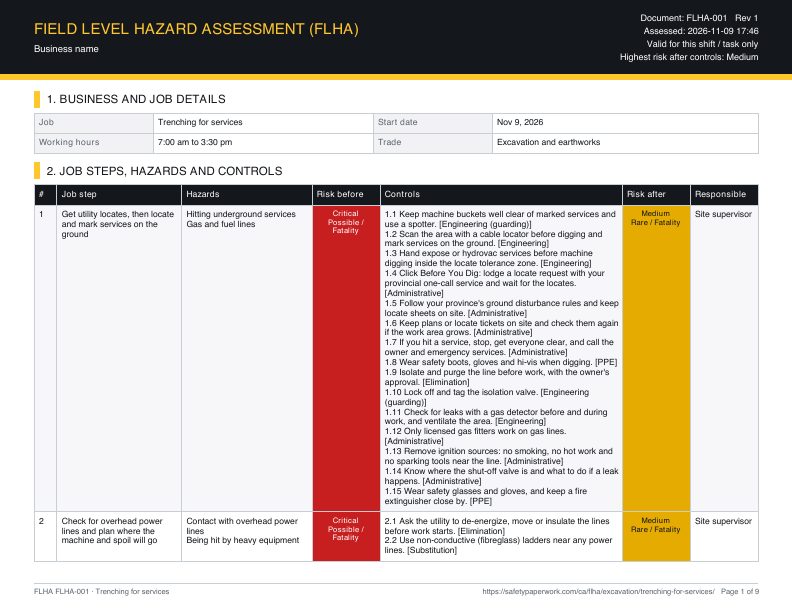
This is a complete FLHA for trenching, with 10 job steps. Open it in the builder to add your site, crew and signatures, change anything, and download a PDF. Or download the free Word template below and fill it in by hand.
Job steps, hazards and controls
| # | Job step | Hazards | Risk before | Controls | Risk after |
|---|---|---|---|---|---|
| 1 | Get utility locates, then locate and mark services on the ground |
| Critical |
| Medium |
| 2 | Check for overhead power lines and plan where the machine and spoil will go |
| Critical |
| Medium |
| 3 | Pothole by hand or vacuum to expose marked services |
| Critical |
| Medium |
| 4 | Set an exclusion zone and a spotter around the excavator |
| Critical |
| Medium |
| 5 | Dig the trench, keeping spoil back from the edge |
| Critical |
| Medium |
| 6 | Shore, slope or use a trench box in any trench deeper than 1.2 m (1.5 m in Alberta and Manitoba) before anyone goes in |
| Critical |
| Medium |
| 7 | Barricade the trench and provide safe ladder access, pump out any water, and keep engine and pump exhaust away from the trench |
| High |
| Medium |
| 8 | Inspect the trench at the start of each shift and after rain |
| Critical |
| Medium |
| 9 | Lay services, then backfill and compact in layers |
| Critical |
| Medium |
| 10 | Reinstate the surface and clean up the road and sidewalk |
| Critical |
| Medium |
PPE
Plant and equipment
Permits and plans
Emergency
Call 911. Add the nearest hospital, the muster point and the first aid attendant for your site.
Sign-off
Supervisor and every worker sign to confirm they have read and understood this FLHA, then sign off at the end of the shift.
Free FLHA template for trenching
Word (.docx) and PDF, Letter landscape, no email needed. Fill in your site details, then print or send it.
Make yours in 2 minutes
Same document, filled in for your job. Answer a few yes or no questions, the crew signs on the phone, and you send the PDF.
Pre-start checklist for trenching
Tick these off before work starts. They come from the hazards, permits and equipment in this job.
- FLHA read, explained and signed by everyone on the job
- Ladder inspected, secured and extending 1 m above the landing
- Overhead lines identified and safe distances marked
- Locates valid and services marked
- Shoring, sloping, benching or a trench box in place; spoil kept back from the edge
- Exclusion zone and spotter set up for equipment and traffic
- Exclusion zone below the work and public kept out
- First aid attendant, first aid kit and emergency number (911) confirmed
- PPE checked and worn: CSA green triangle safety boots (CSA Z195), high-visibility vest (CSA Z96), hard hat (CSA Z94.1), safety glasses (CSA Z94.3)
The safe sequence of work
- Get utility locates, then locate and mark services on the ground
- Check for overhead power lines and plan where the machine and spoil will go
- Pothole by hand or vacuum to expose marked services
- Set an exclusion zone and a spotter around the excavator
- Dig the trench, keeping spoil back from the edge
- Shore, slope or use a trench box in any trench deeper than 1.2 m (1.5 m in Alberta and Manitoba) before anyone goes in
- Barricade the trench and provide safe ladder access, pump out any water, and keep engine and pump exhaust away from the trench
- Inspect the trench at the start of each shift and after rain
- Lay services, then backfill and compact in layers
- Reinstate the surface and clean up the road and sidewalk
Hazards to watch on trenching
The hazards most specific to this job, and the step where each one comes up.
What changes on your site
This example covers the job itself. Your site may add more. Add controls for any of these that apply (the builder asks you these as yes or no questions):
- Could anyone fall 3 metres or more, or fall any distance into machinery, water, a hazardous substance or through an opening?
- Will anyone work on a roof?
- Is there a fragile roof, skylight or clear roof sheet?
- Will you use a scaffold or mobile tower?
- Will you use an aerial work platform (scissor lift or boom lift)?
Licences and legal requirements in Canada
Equipment on this job that needs a licence, ticket or training:
- Excavator: Provincial operator training
- Dump truck: Provincial driver licence for the vehicle class
Employers must identify hazards before work starts and control them, and workers must be told about them. A field level hazard assessment is done on site, at the start of each shift or task, and reviewed again when conditions change.
Rules that apply: Provincial OHS regulation, excavations and trenches.
Why FLHAs get rejected
Prime contractors and COR auditors send documents back for these reasons. This example avoids them, but check yours too.
- End of shift boxes already say "None" when the form was signed at the start of the shift.
- One FLHA reused for days or weeks, or a "review by" date a month away, when the work and conditions change daily.
- No time of assessment and no record of any revision, which Alberta s.7(3) requires.
- Workers signed that they "read" it, but nothing shows they took part, which Alberta s.8(1) requires.
- Work at height with no fall protection plan where the province requires one, or no written rescue procedure for workers using fall arrest.
- Permits or locates required on site but no permit or ticket numbers recorded.
- No re-assessment entry after an obvious change such as weather, a new task or a new crew member.
Rules by province for trenching
| Province or territory | Key local rule | Regulator |
|---|---|---|
| Ontario | Fall protection (O. Reg. 213/91 s.26) applies at a fall of more than 3 m, more than 1.2 m where the work area is used as a path for a wheelbarrow or similar equipment, and at any height into operating machinery, water or other liquid, a hazardous substance, or through an opening. | Ontario Ministry of Labour, Immigration, Training and Skills Development |
| British Columbia | Fall protection is required where a fall of 3 m or more may occur (s.11.2). A written fall protection plan is required at 7.5 m or more where there are no permanent guardrails (s.11.3). | WorkSafeBC |
| Alberta | A hazard assessment must be done before work begins, and before a new work site is built (OHS Code s.7(1)). The results must be written down with the controls (s.7(2)). | Alberta Occupational Health and Safety |
| Quebec | Guardrails (Safety Code s.2.9.1, as amended by Decret 63-2025) are needed where a worker could fall into liquid or a hazardous substance, onto moving parts or dangerous equipment, 1.2 m or more when using a vehicle, 1.5 m or more when handling a load, and more than 3 m in all other cases. | CNESST (Commission des normes, de l'equite, de la sante et de la securite du travail) |
| Manitoba | A prime contractor is required whenever more than one employer or self employed person works on the site at the same time (Act s.7). | Manitoba Workplace Safety and Health Branch |
| Saskatchewan | An occupational health committee is required at 10 or more workers of one employer (Act s.3-22). | Saskatchewan Ministry of Labour Relations and Workplace Safety, OHS Division |
| Nova Scotia | Workers must be trained in fall protection before using it or working in, supervising or planning work in a fall protection area, with a refresher at least every 3 years (WHSR s.21.19). | Nova Scotia Department of Labour, Skills and Immigration, Safety Branch (OHS) |
| New Brunswick | Fall protection is needed from 3 m above water or the nearest permanent safe level (Reg 91-191 s.49(1)(a)(i)). | WorkSafeNB |
| Newfoundland and Labrador | Give written notice to the minister before starting a construction project that will last 30 days or more, with the site, location, type of work and number of workers (Regs s.8). | Government Services, Occupational Health and Safety Division |
| Prince Edward Island | Fall protection is needed from 3 m above the nearest safe surface or water (Fall Protection Regulations s.2(1)(a)). | Workers Compensation Board of PEI, OHS Division |
| Yukon | Every employer must do hazard assessments with the committee, representative or workers, and redo them after significant changes or incidents (Regs s.1.03.01). | Yukon Workers' Safety and Compensation Board |
| Northwest Territories | Fall protection is needed from 3 m, or lower if there is a risk of injury (s.119(1)). Guardrails are needed for falls of 1.2 m to 3 m at permanent work sites (s.119(2)). | Workers' Safety and Compensation Commission (WSCC) |
| Nunavut | No 911. To reach the RCMP in an emergency, dial your community's first three digits then 1111 (Iqaluit: 979-1111). Put the local fire, ambulance and RCMP numbers on every FLHA. | Workers' Safety and Compensation Commission (WSCC) |
Questions
Do I need an FLHA for trenching?
Provincial OHS law requires hazards to be assessed and controlled before work starts. A field level hazard assessment (FLHA) for trenching is done on site at the start of the shift and again whenever conditions change.
Who signs the FLHA?
The supervisor and every worker take part in the assessment and sign on before work starts, then sign off at the end of the shift. Review it and re-sign whenever the task or conditions change.
How long do I keep it?
Keep completed hazard assessments for at least 3 years (COR auditors sample the last 12 months). Review this FLHA and re-sign whenever the task, crew or conditions change.
What PPE is needed for trenching?
Usually CSA green triangle safety boots (CSA Z195), High-visibility vest (CSA Z96), Hard hat (CSA Z94.1), Safety glasses (CSA Z94.3), Hearing protection, Work gloves. The site rules may add more, so check with the general contractor.
More excavation and earthworks FLHAs
Related jobs in other trades
Toolbox talks for this job
Blank FLHA template: free FLHA templates. Also for other countries: Australia (SWMS) · United Kingdom (RAMS) · United States (JHA)