SafetyPaperwork
Plumbing · Australia

SWMS for hot water system replacement

A SWMS is required by law if hot water system replacement includes any high risk construction work, such as working where someone could fall more than 2 metres. Many principal contractors ask for one either way.

It must list the hazards, the controls and how they will be put in place, monitored and reviewed, and the workers must be consulted and sign before starting. The main hazards are electric shock from live wiring, fire from hot works, lifting and carrying heavy loads and gas and fuel lines.

SWMS example: hot water system replacement

This is a complete SWMS for hot water system replacement, with 10 job steps. Open it in the builder to add your site, crew and signatures, change anything, and download a PDF. Or download the free Word template below and fill it in by hand.

Safe Work Method Statement (SWMS)
Replace a hot water system · Plumbing · Example
Document SWMS-001 · Rev 1

High risk construction work covered

None for this task on its own. Tick any that apply on your site.

Job steps, hazards and controls

#Job stepHazardsRisk beforeControlsRisk after
1Check access to the unit and plan the removal route through stairs, roof spaces or tight cupboards
  • Tight spaces: roof spaces and under floors
  • Lifting and carrying heavy loads
High
  • Do as much of the work as you can from outside the tight space. Eliminate
  • Turn the power off at the switchboard before entering where you can, as damaged cables may be live. Isolate
  • Lay crawl boards across the joists so you cannot step through the ceiling. Engineering
  • Set up ventilation and lighting in the space. Engineering
  • Limit time in hot roof spaces and take breaks somewhere cool. Administrative
  • Tell someone when you go in and when you are out. Administrative
  • Wear a dust mask, knee pads, gloves and a bump cap. PPE
  • Plan to avoid carrying: have materials delivered, and old items picked up, as close as possible to where they are used. Eliminate
  • Use lighter or smaller loads: order smaller bags and shorter lengths, and drain or break down old items before moving them. Substitute
  • Use trolleys, pallet jacks, hoists, vacuum lifters or plant instead of carrying by hand. Engineering
  • Use a two-person lift for anything heavy, long or awkward. Plan the route first and clear it. Administrative
  • Keep the load close, back straight and no twisting. Turn with your feet. Administrative
  • Rotate tasks and take breaks on long lifting jobs. Administrative
  • Wear gloves for grip and safety boots to protect your feet. PPE
Medium
2Isolate power at the switchboard and gas or water at the meter, lock out and danger tag
  • Electric shock from live wiring
  • Gas and fuel lines
  • Stored energy
Extreme
  • Isolate the power before any work. Do not do live work except in the limited cases the WHS Regulations allow (r.157; in Qld, the Electrical Safety Regulation 2013). Eliminate
  • Lock out and tag the isolation point with your own personal lock and danger tag. Isolate
  • Electric shock from live wiring: see step 8 for the full controls Administrative
  • Isolate and purge the line before work, with the owner's approval. Eliminate
  • Lock off and tag the isolation valve. Isolate
  • Gas and fuel lines: see step 8 for the full controls Administrative
  • Release or block all stored energy before work: release the pressure in pipes, tanks and hoses, bleed hydraulics, release springs, lower loads. Eliminate
  • Lock out and tag all energy sources with personal locks. Isolate
  • Put mechanical blocks or props under raised parts like buckets, tipper bodies and doors. Engineering
  • Test that the system is dead and nothing can move before you start. Administrative
  • Follow the maker's procedure, for example for garage door and roller door springs. Administrative
Medium
3Drain the old unit, watching for scalding water and steam
  • Hot water and steam
  • Burns from hot surfaces
  • Slips and trips
Medium
  • Turn the system off and let it cool before work. Eliminate
  • Isolate and lock off the heat source and valves, and release the pressure. Isolate
  • Hot water and steam: see step 9 for the full controls Administrative
  • Isolate heating systems and let parts cool before you touch them. Eliminate
  • Fit guards or insulation on hot pipes and equipment. Engineering
  • Mark hot items with chalk or a "HOT" sign so others know. Administrative
  • Keep a first aid kit and cool running water nearby for burns. Administrative
  • Wear heat-resistant gloves and long sleeves. PPE
  • Plan walkways and keep them clear of materials, hoses and leads. Eliminate
  • Run leads and hoses overhead on hooks or stands, or along walls, not across walkways. Engineering
  • Fill or cover holes, and lay boards or mats on muddy access paths. Engineering
  • Clean up offcuts, packaging and spills as you go, not at the end of the day. Administrative
  • Keep work areas, stairs and access paths well lit. Administrative
Low
4Disconnect pipes, flue and wiring, and cap the gas line. Treat old fibre cement flues and base sheets as asbestos until checked, and do not cut or break them
  • Gas and fuel lines
  • Electric shock from live wiring
  • Cuts from sharp edges
Extreme
  • Check for leaks with a gas detector before and during work, and ventilate the area. Engineering
  • Only licensed gasfitters work on gas lines. Administrative
  • Gas and fuel lines: see step 8 for the full controls Administrative
  • Test before you touch: prove dead at the point of work with a voltage tester, proving the tester on a known live source before and after (AS/NZS 4836). Engineering
  • Only licensed electricians do electrical work. Administrative
  • Electric shock from live wiring: see step 8 for the full controls Administrative
  • Deburr or cover sharp edges, and fit edge protectors on exposed sheet metal. Engineering
  • Use knives with retractable or self-retracting blades. Engineering
  • Cut away from your body and keep your other hand clear. Administrative
  • Put used blades in a blade bin or sharps container. Administrative
  • Use two people to handle large sheets of metal or glass. Administrative
Medium
5Remove the old unit using a trolley and two people
  • Lifting and carrying heavy loads
  • Cuts from sharp edges
High
  • Lifting and carrying heavy loads: see step 1 for the full controls Administrative
  • Wear cut-resistant gloves and long sleeves. PPE
  • Cuts from sharp edges: see step 4 for the full controls Administrative
Medium
6Position and secure the new unit on a level base
  • Lifting and carrying heavy loads
  • Tight spaces: roof spaces and under floors
High
  • Lifting and carrying heavy loads: see step 1 for the full controls Administrative
  • Tight spaces: roof spaces and under floors: see step 1 for the full controls Administrative
Medium
7Make pipe joins, with a hot work permit and an extinguisher at hand if soldering or brazing
  • Fire from hot works
  • Burns from hot surfaces
Extreme
  • Use cold work methods where you can, such as bolting, press fittings or cutting with a saw instead of a torch. Eliminate
  • Move anything that can burn at least 15 metres away (AS 1674.1), or protect it with fire blankets or screens. Isolate
  • Use fire-resistant screens to stop sparks reaching people or gaps in walls and floors. Engineering
  • Get a hot work permit before starting. Administrative
  • Keep a charged fire extinguisher and fire blanket at the work spot. Administrative
  • Keep a fire watch during the work and for at least 60 minutes after you finish. Administrative
  • Check for smouldering behind walls, in ceilings and under floors before you leave. Administrative
  • Wear flame-resistant clothing, welding gloves and eye or face protection. PPE
  • Burns from hot surfaces: see step 3 for the full controls Administrative
Medium
8Reconnect gas (by a licensed gasfitter) and power (by a licensed electrician, or a plumber with a restricted electrical licence where your state allows), then leak test the gas with a manometer or leak detection fluid, never a flame
  • Gas and fuel lines
  • Pressure testing
  • Electric shock from live wiring
Extreme
  • Isolate and purge the line before work, with the owner's approval. Eliminate
  • Lock off and tag the isolation valve. Isolate
  • Check for leaks with a gas detector before and during work, and ventilate the area. Engineering
  • Only licensed gasfitters work on gas lines. Administrative
  • Remove ignition sources: no smoking, no hot work and no sparking tools near the line. Administrative
  • Test with water instead of air or gas where the system allows it. Never put water in refrigerant pipework, which is tested with dry nitrogen. Substitute
  • Keep people out of the test area with signs and barriers. Isolate
  • Use a calibrated gauge and a relief valve set to protect the system. Engineering
  • Test to the pressure the system calls for and hold it for the set time. Never go over. Administrative
  • Release the pressure fully before tightening anything or fixing leaks. Administrative
  • Isolate the power before any work. Do not do live work except in the limited cases the WHS Regulations allow (r.157; in Qld, the Electrical Safety Regulation 2013). Eliminate
  • Lock out and tag the isolation point with your own personal lock and danger tag. Isolate
  • Test before you touch: prove dead at the point of work with a voltage tester, proving the tester on a known live source before and after (AS/NZS 4836). Engineering
  • Only licensed electricians do electrical work. Administrative
  • Check for back feeds from solar, batteries and generators that can keep a circuit live after the main switch is off. Administrative
Medium
9Fill and purge air, check the temperature and pressure relief valve and its drain, then commission. Store at 60°C or more, and fit or check a tempering valve so bathroom outlets get no more than 50°C (45°C in aged care, child care and health care), as AS/NZS 3500.4 requires
  • Hot water and steam
  • Pressure testing
Medium
  • Turn the system off and let it cool before work. Eliminate
  • Isolate and lock off the heat source and valves, and release the pressure. Isolate
  • Check the temperature, and open fittings slowly while facing away. Administrative
  • Keep a first aid kit and cool water ready for burns. Administrative
  • Wear heat-resistant gloves, long sleeves and a face shield. PPE
  • Wear safety glasses or a face shield. PPE
  • Pressure testing: see step 8 for the full controls Administrative
Low
10Take the old unit off site and clean up
  • Lifting and carrying heavy loads
  • Poor housekeeping and waste
High
  • Lifting and carrying heavy loads: see step 1 for the full controls Administrative
  • Order materials to size and send packaging back where you can. Eliminate
  • Put skip bins and waste chutes close to the work. Engineering
  • Clean as you go, and do a full clean up at the end of each day. Administrative
  • Keep exits, stairs and walkways clear at all times. Administrative
  • Stack materials neatly on level ground, away from edges. Administrative
  • Wear gloves when handling waste. PPE
Medium

PPE

Steel cap bootsWork glovesSafety glassesP2 dust maskKnee padsHard hatFace shieldOverallsWelding glovesCut-resistant gloves

Plant and equipment

Hand toolsPipe press toolLPG gas torchTrailer

Permits and plans

Electrical isolation permitHot work permit

Emergency

Call 000. Add the nearest hospital, the assembly point and the first aider for your site.

Sign-off

Supervisor and every worker sign to confirm they have read and understood this SWMS.
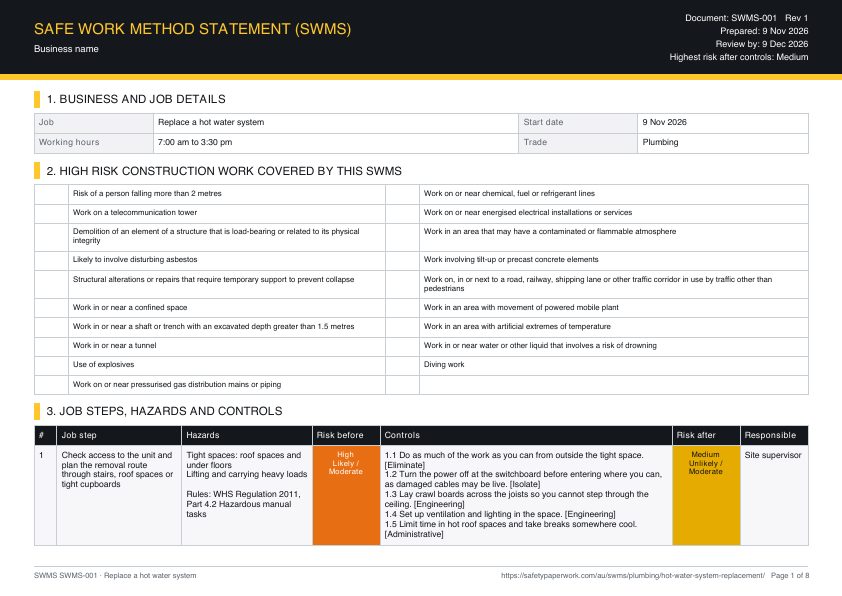
Page 1 of the free hot water system replacement SWMS template: business details, high risk construction work and job steps with hazards, risk ratings and controls

Free SWMS template for hot water system replacement

Word (.docx) and PDF, A4 landscape, no email needed. Fill in your site details, then print or send it.

Make yours in 2 minutes

Same document, filled in for your job. Answer a few yes or no questions, the crew signs on the phone, and you send the PDF.

Start this SWMS

Pre-start checklist for hot water system replacement

Tick these off before work starts. They come from the hazards, permits and equipment in this job.

The safe sequence of work

  1. Check access to the unit and plan the removal route through stairs, roof spaces or tight cupboards
  2. Isolate power at the switchboard and gas or water at the meter, lock out and danger tag
  3. Drain the old unit, watching for scalding water and steam
  4. Disconnect pipes, flue and wiring, and cap the gas line. Treat old fibre cement flues and base sheets as asbestos until checked, and do not cut or break them
  5. Remove the old unit using a trolley and two people
  6. Position and secure the new unit on a level base
  7. Make pipe joins, with a hot work permit and an extinguisher at hand if soldering or brazing
  8. Reconnect gas (by a licensed gasfitter) and power (by a licensed electrician, or a plumber with a restricted electrical licence where your state allows), then leak test the gas with a manometer or leak detection fluid, never a flame
  9. Fill and purge air, check the temperature and pressure relief valve and its drain, then commission. Store at 60°C or more, and fit or check a tempering valve so bathroom outlets get no more than 50°C (45°C in aged care, child care and health care), as AS/NZS 3500.4 requires
  10. Take the old unit off site and clean up

Hazards to watch on hot water system replacement

The hazards most specific to this job, and the step where each one comes up.

Step 3, 9Hot water and steamOpening hot water systems, boilers or steam lines scalds workers.
Step 1, 6Tight spaces: roof spaces and under floorsCrawling through roof spaces, under floors or in tight ceilings leads to falls through the ceiling, heat stress, shocks and cuts.
Step 3, 7Burns from hot surfacesTouching hot pipes, tools, bitumen, solder or freshly welded metal burns the skin.
Step 8, 9Pressure testingA pipe, fitting or cap fails under test pressure and blows apart, hitting people nearby.
Step 2Stored energyEnergy left in springs, hydraulics, compressed gas, raised loads or capacitors releases suddenly and crushes or injures workers.
Step 7Fire from hot worksSparks and heat from welding, grinding or flame torches set fire to timber, insulation, rubbish or fuel nearby.
Almost certainLikelyPossibleUnlikelyRareHow bad it could be: Insignificant to CatastrophicBA
Highest risk on hot water system replacement: Extreme before controls (B), down to Medium after controls (A), on the Australia 5 by 5 risk matrix (possible and catastrophic becomes unlikely and moderate).

What changes on your site

This example covers the job itself. Your site may add more. Add controls for any of these that apply (the builder asks you these as yes or no questions):

  • Will anyone work more than 2 metres off the ground?
  • Will anyone use a ladder or stepladder?
  • Will anyone work on a roof?
  • Is there a skylight, clear sheet, fibro or other fragile roofing?
  • Will you use a scaffold or mobile tower?

Why SWMS get rejected

Principal contractors send documents back for these reasons. This example avoids them, but check yours too.

  • It is generic: another site address, tasks that are not on this job, or no sign it was reviewed for this site. WorkSafe WA says a generic SWMS may not meet the regulations unless it is reviewed and amended for the workplace.
  • The HRCW boxes are not ticked, or the ticks do not match the tasks (for example a roof job with no falls box ticked).
  • Falls are controlled only by "be careful", training or a harness, with no edge protection or scaffold and no reason why higher controls are not reasonably practicable.
  • Workers will clip on to a harness but there is no rescue plan for someone left hanging.
  • The "how controls are implemented, monitored and reviewed" part is missing, or it says the same thing on every row.
  • No worker sign-on, no person responsible for compliance, or a date given to the principal contractor that is before they actually received it.
  • Licence or White Card details are missing for workers operating plant or doing licensed high risk work.

Questions

Do I need a SWMS for hot water system replacement?

A SWMS is required by law if hot water system replacement includes any high risk construction work, such as working where someone could fall more than 2 metres. Many principal contractors ask for one either way.

Who signs the SWMS?

The person conducting the business (PCBU) or their supervisor prepares it with the workers, and every worker doing the high risk work signs to show they were consulted and understand it. Give a copy to the principal contractor before work starts.

How long do I keep it?

Keep this SWMS, and every revised version, until the high risk construction work is finished, where workers and inspectors can see it on site. If a notifiable incident happens during the work, keep it for at least 2 years after the incident.

What PPE is needed for hot water system replacement?

Usually Steel cap boots, Work gloves, Safety glasses, P2 dust mask, Knee pads, Hard hat, Face shield, Overalls, Welding gloves, Cut-resistant gloves. The site rules may add more, so check with the principal contractor.

More plumbing SWMS

Related jobs in other trades

Toolbox talks for this job

Blank SWMS template: free SWMS templates. Also for other countries: United Kingdom (RAMS) · United States (JHA) · Canada (FLHA)

Sources